Building an Active Directory and Group Policy Homelab
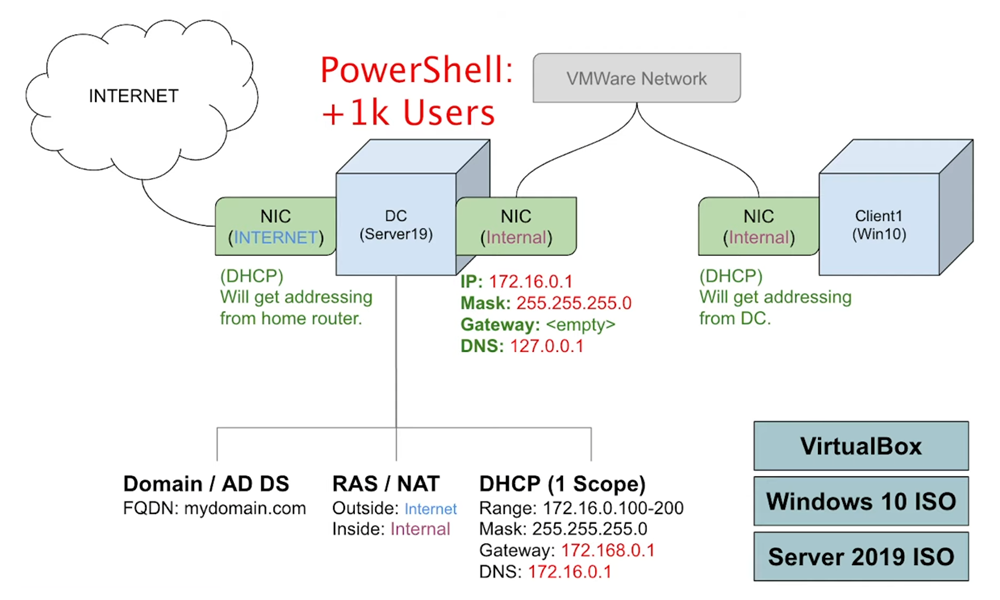
In this lab, we will setup and configure an Active Directory Domain Controller, replicating a real-world network environment. By connecting a Windows 10 client machine to it, and utilizing a PowerShell script to generate over 1,000 user accounts. This setup serves as a practical platform for hands-on learning about Active Directory, Group Policies, and troubleshooting common network issues.
Files necessary to follow along
Procedures
Setting up Windows Server 2019
Download and open Oracle VM VirtualBox.
Click Machine > New, and add a name for your Domain Controller (“DC” or “DomainController”).
Set the Type to “Microsoft Windows” and Version to “Windows 2019”, and press Next.
(Note: I do not to link the ISO until I boot up the VM and am prompted to, because I’ve ran into issues doing so previously.)
For the following setup screens, these are the options I used:
- Hardware:
- Base Memory: 2048 MB
- Processors: 1
- Virtual Hard Disk:
- Disk Space: 20.00 GB
Select the Virtual Machine you have just created and press Settings:
- General > Advanced
- Shared Clipboard: Bidirectional
- Drag’n’Drop: Bidirectional
- Network > Adapter 1:
- Enable Network Adapter: True
- Attached to: NAT
- Network > Adapter 2:
- Enable Network Adapter: True
- Attached to: Internal Network
- Name: intnet
Select OK, click the Virtual Machine again, and select Start.
The virtual machine will load and ask you to link an ISO file.
Download and link the Server 2019 ISO and press “Mount and Retry Boot”.
We now have the Virtual Machine setup, the next steps will take place inside of Windows!
DC: Windows Setup Wizard
Continue through the Windows Setup wizard.
Select the following options as they appear:
- Select the operating system you want to install.
- Windows Server 2019 Standard Evaluation (Desktop Experience)
- Which type of installation do you want?
- Custom: Install Windows only (advanced)
- Click next to the following screen to select the default partition.
- Customize Settings:
- Password: Password1
- (To keep the lab simple, I suggest using the same password throughout the entire lab.)
- Password: Password1
Configuring NICs (Internal/External Networks)
Navigate to Control Panel > Network and Internet > Network and Sharing Center > Change Adapter Settings.
Right-click on the adapter named "Ethernet" > select Status.
- Verify that it displays “IPv4 Connectivity: Internet”, and close the window.
- Right-click on “Ethernet” again, choose Rename > and set the name to “_INTERNET_”.
- Right-click on “Ethernet 2”, choose Rename > and set the name to “_INTNET_”.
- (This will help make our networks more easily identifiable in the future.)
We will now change the IPv4 settings of the internal network to those in the diagram above.
- Right-click on “_INTNET_” > select Properties.
- Click Internet Protocol Version 4 (TCP/IPv4) > click Properties.
- General > Enable “Use the following IP Address:”
- IP address: 172.16.0.1
- Mask: 255.255.255.0
- Gateway: <empty>
- Preferred DNS server: 127.0.0.1 (Loopback address)
- Alternate DNS server: <empty>
Renaming the PC
Right-click on the Start Menu > select System.
- Click the “Rename this PC” button.
- Change the name of the device to “DC” for Domain Controller.
- Choose the option to Restart now to apply the changes we have made so far.
Configuring Active Directory Domain Services
Now that we have configured our NICs, the next step is to set up our Domain (Active Directory Domain Server).
Open Server Manager > select “Add roles and features”.
Click next until you get to the Select destination server/Server Selection tab.
- Select DC, and click Next.
- Select Active Directory Domain Services, and click Next.
- Click Next through the rest of the settings, and click Install.
On Server Manager, there should now be a Notifications icon (a flag with a yellow caution symbol) in the top right.
Select it, and select “Promote this server to a domain controller”.
This will open the Active Directory Domain Services Configuration Window, choose the following settings:
- Deployment Configuration:
- Select the deployment option: Add a new forest.
- Root domain name: mydomain.com
- Domain Controller Options
- Password & Confirm Password: Password1
- Click Next through the rest of the settings, and click Install.
Creating a dedicated domain admin user account
Open Active Directory Users and Computers.
Right-click on mydomain.com > select New > Organizational Unit
- Name: “_ADMINS”
- Right-click “_ADMINS” group > New > User
- Now set up the Admin account with your information, in this format:
- First name: John
- Last name: Smith
- User logon name: j-smith@mydomain.com
- Click Next.
- Password & Confirm Password: Password1
- Uncheck “User must change password at next logon”
- Check “Password never expires”
- Click Next and Finish.
To set your new User Account as a Domain Admin, select the user account, and right-click > Properties.
- Member Of > Add
- In “Enter the object names to select (examples):
- Type “domain admins”.
- Click Check Names
- Apply the settings.
Now we can sign out of our account, and sign in with our new user account.
On the Sign-in screen, select Other Users, and enter the credentials for your user.
- For example:
- Username: j-smith
- Password: Password1
Network Configurations
Configuring Remote Access Server (RAS)/NAT
We will set up a RAS/NAT to allow our client virtual machines to be on a private virtual network, but still be able to access the Internet through the Domain Controller.
Open Server Manager > select “Add roles and features”.
Click next through the Wizard, choosing these options on the following tabs:
- [Server Selection] Select DC
- [Server Roles] Select Remote Access
- [Role Services] Select DirectAccess and VPN (RAS)
- Select Routing
- Click Next through the rest of the settings, and click Install.
Navigate to Server Manager > Tools > Routing and Remote Access
- Right-click on ‘DC (local)’ and select Configure and Enable Routing and Remote Access
- Click next through the Wizard, choosing these options on the following tabs:
- [Configuration] Select Network address translation (NAT)
- [NAT Internet Connection] Select “Use this public interface to connect to the Internet”
- Select _INTERNET_.
- (If these options are unavailable, try closing and reopening Routing and Remote Access).
- Click Next through the rest of the settings, and click Finish.
Now there should be a green symbol next to ‘DC (local)’ in Routing and Remote Access, this means that we configured it correctly. Now client VMs should be able to once we set up DHCP for them!
Configuring the DHCP Server
Open Server Manager > select "Add roles and features".
- Click next through the Wizard, choosing these options on the following tabs:
- [Server Selection] Select DC.mydomain.com
- [Server Roles] Select DHCP Server
- Click Next through the rest of the settings, and click Install.
- Navigate to Server Manager > Tools > DHCP
- Expand the dc.mydomain.com drop-down menu.
- Right-click on IPv4 and select New Scope…
- Click next through the Wizard, choosing these options on the following tabs:
- [Scope Name] Name: 172.16.0.100-200
- [IP Address Range]
- Start IP Address: 172.16.0.100
- End IP Address: 172.16.0.200
- Length: 24
- Subnet mask: 255.255.255.0
- [Router (Default Gateway)] IP address: 172.16.0.1 (and click Add!)
- Click Next through the rest of the settings, and click Finish.
- Right-click on dc.mydomain.com and select Authorize.
- Right-click on dc.mydomain.com and select Refresh.
- A green symbol should appear next to IPv4 and IPv6 to show that DHCP is now properly configured!
How to enable internet access from this virtual machine
(In a real production environment, you would not want to allow a domain server to access the Internet.)
- Inside of Server Manager:
- Select the Local Server tab on the left-hand side.
- Find the properties set for “IE Enhanced Security Configuration: On”.
- Change the setting to Off for both Administrators and Users.
Automating User Account Creation with PowerShell
Download the PowerShell script from this repository onto the Server by copying this link and pasting it into Internet Explorer.
Download and open the .zip file, choose the Compressed Folder Tools options tab and press Extract All.
Browse to your Desktop folder and select Extract.
The names.txt file contains a list of names that our PowerShell script will use to populate our Active Directory with user accounts.
Open names.txt, add your name to the file, and save it.
Run Windows PowerShell ISE as Administrator.
In PowerShell click File > Open and navigate to the AD_PS Folder/CREATE_USERS.ps1.
- Type the command “Set-ExecutionPolicy Unrestricted” into the PowerShell Terminal, and press enter.
- Select “Yes to all” on the window that appears.
- Type the command “cd C:\Users\j-smith\Desktop\ActiveDirectoryHomeLab”.
- (Replace “j-smith” with the username for the admin account that you created.)
- Press the Run Script button (or the F5 key) to start executing the script.
Now if you open Active Directory Users and Computers, expand mydomain.com, and click the _USERS folder, you can see all of the users inside!
Note that the way we formatted these user accounts is different than how we set up the admin account:
- j-smith (Administrator)
- jsmith (User)
Setting up Windows 10 Client
Created Windows 10 ISO using Media Creation Tool
- Made clipboard & drag/drop bi-directional for ease of use
- Assigned 20GB storage, 2048MB RAM, 2 CPUs
- Changed Network from NAT to Internal Network, to use DC’s DHCP server. (and simulate a real corporate network)
- Used ipconfig and ping mydomain.com to make sure connectivity was working correctly.
- Checked hostname and change by going to Settings > Rename this PC (advanced) to both rename PC and join domain at the same time:
In Oracle VM VirtualBox - Click Machine > New, and add a name for your Client VM (“CLIENT1”).
Set the Type to “Microsoft Windows” and Version to “Windows 10”, and press Next.
For the setup screens, use the same options as the Server VM:
- Hardware:
- Base Memory: 2048 MB
- Processors: 1
- Virtual Hard Disk:
- Disk Space: 20.00 GB
Select the Virtual Machine and press Settings:
- General > Advanced
- Shared Clipboard: Bidirectional
- Drag’n’Drop: Bidirectional (This will allow you to copy/paste between your PC and VM.)
For this CLIENT VM, we will only use an Internal network as internet access will be provided via our DC's DHCP server.
- Network > Adapter 1:
- Enable Network Adapter: True
- Attached to: Internal Network
- Name: intnet
Select OK, and start the Virtual Machine.
The virtual machine will ask you to link an ISO file.
Link the Windows 10 ISO that you have created, and press “Mount and Retry Boot”.
Client VM: Windows Setup Wizard
Continuing through the Windows Setup wizard, these are the options you should select when prompted to:
- Activate Windows
- “I don’t have a product key”.
- Select the operating system you want to install.
- Windows 10 Pro (IMPORTANT!)
- Which type of installation do you want?
- Custom: Install Windows only (advanced)
- Click next to the following screen to select the default partition.
- Let’s connect you to a network
- “I don’t have internet”
- Continue with limited setup
- Who’s going to use this PC?
- Name: user
- Password: Password1
- Services
- For privacy settings, I like to disable everything, and skip customization.
And there we go! Now if you open Command Prompt and type ipconfig then all of your internet settings should be assigned from your Domain Controller. (As long as you have both VMs running at the same time!)
You should have access to the internet via the Domain Controller, and you can verify this by running the command ping google, or ping mydomain.com to ping the DC and get a response.
There is only one final step in joining the Domain Controller, and that is:
- Open Settings > System > About > Related Settings > Rename this PC (advanced).
- [Computer Name] Press the “Change…” button.
- Computer name: CLIENT1
- Member Of: Domain: mydomain.com
- A Windows Security tab will open, and you can enter the user account you created for yourself to give the PC access to the domain. (jsmith/Password1)
- Allow the PC to restart to join it to the domain.
When the VM reaches the sign in screen, you can now choose the “Other user” option and sign-in with any of the user accounts that we created earlier. A new profile will be built whenever a new user signs in.
Conclusion
We now have a simulated corporate network environment that we can use to experiment in! There are a ton of different possibilities to use this environment for experimenting and getting hands-on experience in providing troubleshooting issues in the Windows Operating System, and learning about Active Directory, DNS, DHCP, Group Policy, and really anything else!
Here are some examples of ways that I have used this lab, which I may go over in-depth in a Group Policy lab in the future!
- Creating Group Policy objects to apply computer and user configurations. Enforcing wallpapers, password account policies, deploying software, configuring Windows Firewall (to enable things like RDP), drive mapping policies, and user folder redirection to keep user profiles saved on the DC itself.
- Setting up Network Shares (NTFS & Share Permissions) to allow specific users/security groups to access files from the Domain Controller.
- Learning how to set up Task Scheduler (for automated backups), creating scenarios of real-world issues, and using Event Viewer logs and research to give yourself useful experience in solving issues that you will face in the real world in Information Technology.